Migration of VMs from Hyper-V to Nutanix using Veeam, experiences and tips.

This weekend we had a migration of a public customer. The competitor did not provide us with host access to the Hyper-V hosts of obvious reasons. So the migration point of attack was using Veeam.
We did setup a VPN towards the environment and installed the Veeam agent on each VM, about four days prior to expected cut-over date and started doing full backups. Once the full backup finished we continued with incremental backups each night.
Before restoring from the backups to the Nutanix environment i used my own web-move-repository to install the VirtIO drivers and get the Retain IP scheduled task etc. You can read more about my move-offline repository in my previous post. Before we proceeded with the real migration we did a POC migration to proof to the customer that the chosen method of migration was functional.
We where not able to restore directly from Veeam into the AHV environment. So we had to restore the disk files and upload them to the Image-Service in prism using google chrome web browser.
Later we started a case with veeam support, and for future reference we need to make sure that the backup-repo have sufficient level of rights towards the environment of restore. You can follow this article from Veeam for reference.
I Created all the VMs in Prism so we had empty VMs without disks, and restored the network cards with acli to retain the Mac-address of the virtual machines. I often retain the MAC of the VMs to avoid potential licensing issues with applications installed on the servers.
I added the NICs with the following commands in acli
acli vm.nic_create <VM NAME> mac=xx:xx:xx:xx:xx:xx network=<Name of VLAN>On the cut-overdate we decreased the time between the incremental backups to reduce the time the incremental backups where to take.
Below i will share some experiences i ran in to during the migration.
After restore of the Disks of their domain controllers, the domain controllers where non functional. If you read the best practises from microsoft they recommend that you don’t migrate domain controllers. But the timeframe of this migration where tight and we did not have time to setup new controllers and replicate the domain. Add to the mix that the competitor installed a bunch of other roles to the domain controllers as well.
The Domain Controllers had entered DSRM mode, and in the documentation we got, did not contain any DSRM password. So, we had to dig deep to restore the DSRM password and force the Domain controllers out of DSRM mode.
We found this article at Veeams KB-archive, but the problem still persisted.
So we went with the god old Utilman.exe hack to reset the “local password (DSRM)” on the two domain controllers in the environment.
To be able to do that we booted the server with the Installation ISO of Windows Server and chose Troubbleshoot
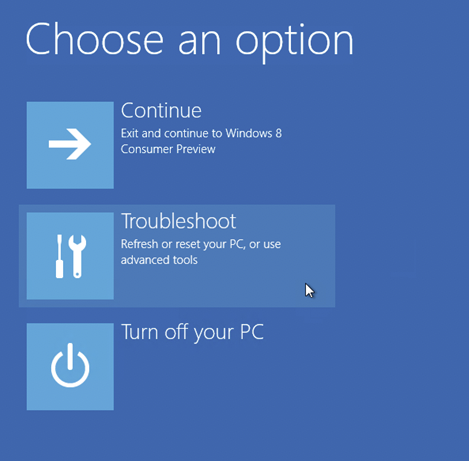
Then we open cmd.

Once in the advanced startup options, we use this KB from Nutanix to load the VirtIO drivers with the command drvload so we can browse the vDISK within cmd to change the Utilman.exe with cmd.exe using the comand
cd F:\Windows\System32\
copy Utilman.exe Utilman-old.exe
copy cmd.exe Utilman.exe
For detailed steps, look at this blog post.
Once that was done we booted the machine and ran the net user commands
net user administrator <New password>
net user administrator enable
After that we where able to log in to the DCs and run the commands in elevated cmd from the Veeam article above.
The next road-bump we ran in to was a DirectAccess server that we migrated. The DirectAccess server is configured via GPO. And that GPO have pretty hard settings on what interfaces to use, since we changed from Hyper-V virtual network cars to Nutanix Virtual NICs we needed to change the UUIDs in the GPO, and that can only be done with Powershell.
The interesting part to change is this settings in the DirectAccess GPO:

We used the Powershell cmdlet Set-GPRegistryValue, you can find the official documentation here. First we run the “Get-GPRegistryValue” to get how the current config looks like:
Get-GPregistryValue -Name "DirectAccess Server Settings" -Key 'HKEY_LOCAL_MACHINE\Software\Policies\Microsoft\Windows\RemoteAccess\Config\MachineSIDs\S-1-5-21-1321498037-3383424371-
306038863-3195' -ValueName "InternalInterface"
To find the Interface GUID, go in to the registry and browse to HKEY_LOCAL_MACHINE\SYSTEM\CurrentControlSet\Services\Tcpip\Parameters\Adapters, copy the GUID of the Internally faceing intererface.
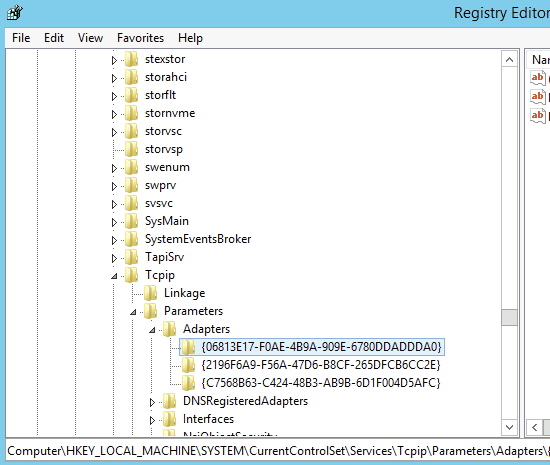
Then run:
Set-GPregistryValue -Name "DirectAccess Server Settings" -Key'HKEY_LOCAL_MACHINE\Software\Policies\Microsoft\Windows\RemoteAccess\Config\MachineSIDs\S-1-5-21-1321498037-3383424371-306038863-3195' -ValueName "InternalInterface" -Value <GUID COPIED FROM REGEDIT> -Type StringRepeat for the Internet Faceing Interface and reboot the server.
After those settings DirectAccess worked like a charm and the rest of the migrations went on smoothly
Conclusion:
I would love for Nutanix to develop Nutanix Move for P2V migration in those case of senarios, it would be much easier migration jobs when you don’t have hypervisor access on the source, but everything is possible with dedication and grit, and we ended up with an impressed and happy customer
Special Thanks to my colleagues erto, allo and fror for good co-operation on this project! :)